Openlayers 3 in Coresight

I have been reading Marcos Vainer Loeff over on PISquare about his google maps symbol in Coresight. This great article inspired me to write nearly the same but then with the open source libraries OpenStreetMap and Openlayers.

Since OSIsoft released the 2016 version of Coresight, I am a big fan. I can see where they are going, and I like it. For a developer like me, it is great to be able to contribute to an existing platform while the heavy lifting has already been done.

So this is about the Coresight Extensibility framework. As always you start out with the basic skeleton (all files go into the ext folder, see the Coresight Extensibility docs for details):

(function (CS) {
    var definition = {
        typeName: 'magionopenlayers',
        datasourceBehavior: CS.DatasourceBehaviors.Multiple,
        getDefaultConfig: function () {
            return {
                DataShape: 'Table',
            };
        },
        configOptions: function () {
            return [{
                title: 'Format Symbol',
                mode: 'format'
            }];
        },
        init: init
    };
    CS.symbolCatalog.register(definition);
})(window.Coresight);

Big decisions right away: the Table DataShape means we will be dropping AF Elements on the display, and the Multiple behavior indicates that it is ok to drop more than one element on the symbol.

Here’s how the symbol will look once configured and connected to AF elements:

cs2016-openlayers-symbol

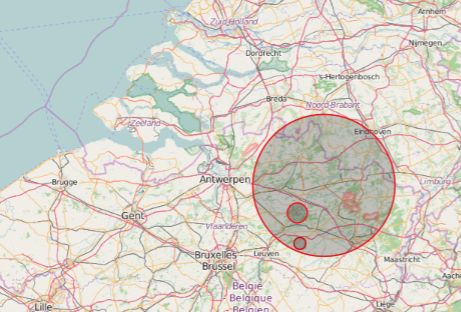
The idea is that the radius of the circle corresponds to the value of the attribute. The centre of the circle is the elements current position. These circles are on the Vector layer of our map. That layer is displayed on top of the OpenStreetMap layer. All this is defined in a function called startOpenlayers:

        // create the map, OpenStreetMap uses EPSG:3857
        // two layers: 1 is OSM, the other is a vector with AF attributes
        scope.startOpenlayers = function () {
            if (scope.map === undefined) {

                scope.vectorSource = new ol.source.Vector({
                    features: []
                });

                scope.vectorLayer = new ol.layer.Vector({
                    source: scope.vectorSource
                });

                scope.map = new ol.Map({
                    target:elem.find('#'+scope.id)[0],
                    layers: [
                      new ol.layer.Tile({source: new ol.source.OSM()}),
                      scope.vectorLayer
                    ]
                    ,
                    view: new ol.View({
                      center: ol.proj.fromLonLat([0, 0]),
                       zoom: scope.config.ZoomLevel
                    })
                });

                scope.map.on('moveend', function() {
                    // if the user zoomed the map, store the changed config,
                    // the user will have to save the display
                    scope.config.ZoomLevel = scope.map.getView().getZoom();
                });
            }
        };

As you can see in the code the ZoomLevel is part of the config, it is stored with the display. Other configurable things are:

        getDefaultConfig: function () {
            return {
                DataShape: 'Table',
                Height: 300,
                Width: 400,
                MarkerColor: '#ff0000',
                Transparency: 0.3,
                StrokeColor: '#ff0000',
                StrokeWidth: 3,
                Lat: "Lat",
                Lon: "Lon",
                Value: "Value",
                ZoomLevel: 12,
                Scaling: 1000,
            };
        },

Lat, Lon and Value are the names of the AF attributes. Scaling is a number with which each actual value is multiplied. Use this to  create the right information density on your map. If you need finer control, you have to fix it in the AF element. The other attributes define the appearance of the circle.

In order to have direct feedback when the user uses the config panel, you have to implement the configChange function, which is called updateOpenlayersConfig in this symbol:

        // function that applies the configurastion changes directly
        scope.updateOpenlayersConfig = function (config) {
            var color = scope.makeTransparent(config.MarkerColor);
            scope.makeStyle(color);
            // we have to redraw our features with this style
            scope.vectorSource.forEachFeature(function(f){
                f.setStyle(scope.style);
                if(config.Scaling!=oldScaling){
                    var geom = f.getGeometry();
                    geom.setRadius(geom.getRadius()*config.Scaling/oldScaling);
                }
            });
            oldScaling = config.Scaling;
            // apply the zoom level
            scope.map.getView().setZoom(config.ZoomLevel);
        };

This function is inside the init function of the symbol. The most important part of that function is the dataUpdate function. This functions handles how the symbol updates itself when it receives new data from the Coresight runtime. This happens every 5 seconds and is not configurable per symbol, only for all of Coresight, which is a pity and I think this should be fixed in the final product.

Remember that the symbol accepts multiple table-ly things to be dropped upon it. This is reflected in the data that the symbol receives: A table with rows for each attribute of each element. Only the first time Coresight will indicate which row belongs to which attribute. That is where the developer should store the index of the attribute, so that on the next update (without the Label property) the symbol still knows what is what. The Label property is an AF path string Element|Attribute. If you need more information there is also the Path property which will give you af:\\Server\Database\Path\To\Element|Attribute. In subsequent updates only Value and Time will be in the row.

        scope.dataUpdate = function (data) {
            if ((data == null) || (data.Rows.length == 0)) {
                return;
            }
            if (scope.map != undefined) {
                // this is where we draw the features
                for (var i = 0; i < data.Rows.length; i++) {
                    // do we have a label?
                    if(data.Rows[i].Label!==undefined){
                        var splits = data.Rows[i].Label.split('|');
                        // splits[0] will be the element
                        if ((splits[1] == scope.config.Lat) || (splits[1] == scope.config.Lon)) {
                            // we have coordinates, so we can add or update our Features
                            if (scope.Features[splits[0]] == undefined) {
                                scope.Features[splits[0]] = new Object();
                                scope.Features[splits[0]].MarkerCreated = false;
                                scope.Features[splits[0]].LatIndex = null;
                                scope.Features[splits[0]].LonIndex = null;
                                scope.Features[splits[0]].ValueIndex = null;
                            }
                        }
                        // we have to memorize the indices per element
                        if (splits[1] == scope.config.Lat) {
                            scope.Features[splits[0]].LatIndex = i;
                        }  

                        if (splits[1] == scope.config.Lon) {
                            scope.Features[splits[0]].LonIndex = i;
                        }  

                        if (splits[1] == scope.config.Value) {
                            scope.Features[splits[0]].ValueIndex = i;
                        }
                    }
                }

So now all rows have been parsed and the feature placeholders have been created. Now it’s time to insert the values from AF and draw them with Openlayers. We set the element name as an Id on the feature so that the next update can find the feature using that key. The configured style is applied to the feature and it is added to the layer.

                // Features are in. Let's draw them
                for (var key in scope.Features) {
                    var currentElement = scope.Features[key];
                    // the parseFloat is required to get the coordinates right
                    var lon = parseFloat(data.Rows[currentElement.LonIndex].Value);
                    var lat = parseFloat(data.Rows[currentElement.LatIndex].Value);
                    var val = parseFloat(data.Rows[currentElement.ValueIndex].Value);

                    if ((currentElement.MarkerCreated == false)) {
                        if ((currentElement.LatIndex != null) && (currentElement.LonIndex != null)) {
                            // fromLonLat transforms to EPSG:3857 by default
                            // (Web or Spherical Mercator, as used for example by Bing Maps or OpenStreetMap)
                            var coordinate = ol.proj.fromLonLat([lon, lat]);
                            var iconFeature = new ol.Feature({
                                geometry: new ol.geom.Circle(coordinate, val * scope.config.Scaling),
                            });
                            iconFeature.setId(key); // this assumes one feature per element
                            iconFeature.setStyle(scope.style);
                            scope.vectorSource.addFeature(iconFeature);
                            currentElement.MarkerCreated = true;
                            // center the map on the latest feature
                            scope.map.getView().setCenter(coordinate);
                        }
                    }else{

Next update cycles use the key to get the feature and update radius and centre as the values of the underlying AF element change over time.

                        // update position and value
                        var feature = scope.vectorSource.getFeatureById(key);
                        if(feature !== undefined){
                            var geom = feature.getGeometry();
                            geom.setCenter(ol.proj.fromLonLat([lon, lat]));
                            geom.setRadius( val * scope.config.Scaling);
                        }
                    }
                }
            }

The complete project can be found on our downloads page.

Using App Inventor to create my son’s game

I like writing apps. Getting all dirty and nerdy. But I can hardly ever find something to make an app for. I sometimes have an idea, and then I think it is too related to my day job. Then I get an idea and I finally conclude it’s actually a web site that just should style for mobile.

Luckily I have an imaginative son who said one day: Dad, shall we make a game app. It turned out he wanted to create Space Invaders. Now there’s a brand new idea! As a dad you don’t let your kid down, so I started looking for tools. I had done the native android development with eclipse, I had done a Cordova app, but the kid should be able to tweak the code, so I chose App Inventor.

The first afternoon went by setting up the computer, the device and reading the excellent tutorials. Then we started trying to get the bad UFO to bounce of the walls of our starry starry sky. Space may be infinite, a phone’s screen is not. We got the pictures from the internet. Cut them out, and uploaded them to our new project. Here’s the bad UFO:

bad-ufo

In the final game, we made black transparent, so we could see the stars shine through the windows, if that’s what they really are…

With App Inventor version 1 you have a web site hosted by MIT where you create your screens and objects on those screens, and you have a local java app where you create the logic of the app. This is done with MIT’s fantastic blocks interface. I think the idea originated with scratch and was then generalized to more diverse applications. I have been thinking about using it to create PI Perfomance Equations, but that is a work related idea, so not worth mentioning here. In version 2 MIT promises it is all web based. We did not work on the emulator, but on the device directly. You download the companion app to App Inventor,. start it up, in your blocks editor select WiFi, scan the barcode and the app should appear on the device. It had some quirks (it is beta). Restarting the phone was usually the quickest way to restore communication between the code and the device.

Getting the big bad UFO to continuously go from left to right required one event block:

ufo.edgereached

The heading (0, move right) of the bad UFO was given in the web site, and also that we did not want it to rotate. So all we had to do was tell it to bounce. Putting the speed here is for future features where we might want to change it based on all kinds of non-related things: hours in the game, score, etc..

As the bad UFO’s heading is fixed and will never change, we don’t need to inspect the edge variable. It will always be either the left or the right side of the device. As the desired behavior is the same in both cases, no conditional logic is required.

Having taken this first great step, my son decided it was time to add some interaction to the game. There would be another UFO that would swim in the same universe trying to avoid the bombs that the bad UFO would spit out. And you could of course move your own UFO by dragging it around the screen.

Here is your very likeable UFO:

my-ufo-150

Both UFO’s are rather big. For the bad one that’s just because bigger is scarier, but for the lovely one, it’s because we have to be able to put our finger on it, so that we can drag it, tap it, fling it.

In the first iteration the only requirement was to drag it out of the way of the falling bomb.

mijnufo.dragged

Everything on the canvas (except the background) is a sprite. There is the bad UFO (called ufo in the blocks), our character (mijnUFO), a bomb (bom) and very basic animation when things go boom and shots are fired.

When we drag the UFO on the screen, we update the current x position and keep the y position fixed. This ensures that the good UFO stays on the bottom, because that’s where we put in the design on the web page. We placed the bad UFO on the top and as it can only move left and right we have a nice distance between the good and the bad.

The next step was to add the bomb. You would expect that a 12 year old boy would come up with some fantastic weapon of mass destruction…

mine

Yes. The universe is actually an ocean full of mines. If the bomb does not hit the UFO it passes into space and will remain there forever unless it collides with something. This app pollutes the universe.

In this app we keep the bomb and the bad UFO together using a timer. Wherever the UFO goes, so does the bomb. To make the game a game, we have to release the bomb at some point. That’s done with random numbers:

bomClock.Timer

What this code does is making the bomb follow the bad UFO. There is a twist though. The bad UFO’s position is determined by its heading and speed and the App Inventor’s internal timing. The bomb has its own timer. Sometimes this will look extraordinary. When the bomb’s timer fires, the things in the block above are executed. If the bomb hasn’t been dropped, it will follow the movements of the bad UFO. There’s a 1 in 10 chance it will be dropped, and when that happens, it will look for your UFO and go for it. If you do nothing your UFO will be destroyed!

As you can see this timer code only executes if a certain global variable (dropping the bomb) is not true. This is a waste of the system’s resources, but I could not find a way to make it more event driven. I found that enabling another timer from another function did not work. I could not get the animation given here working. So I enabled all timers from the web site and put global variables around the execute function hoping that would not reduce performance that much.

In the final app, I have these global variables. Note that all of them are used to define state.

globals

For the people that don’t understand Dutch, from top to bottom: isSomethingExploding, areWeFiring, didWeHitTheBomb, isTheBombFalling, score and boomCount.

Getting back to what’s happening on the device: We have a big bad UFO constantly moving from left to right, right to left. There’s also us, with our not so small UFO, trying to escape being hit by the bomb that the bad UFO drops in 1 out of 10 times that its clock fires.

The next major thing is to find out whether the bomb hits us. App Inventor offers collision detection by calculating whether the bounding rectangles of the sprites collide. In a real game you may not want to use this feature. Given the form of our UFO, we don’t want to treat it as a rectangle. There is a workaround, that involves a lot of work: you could put sprites of a small size alongside of the UFO at strategic spots, such as the wings, have them move with the UFO and have those “points” as collision detectors.

In this example we use the collision detection on the rectangles that bound the bomb, the UFO and our fire. Yes, we can try to shoot the bomb before it hits us.  That’s why the bomb is small, as well as the things we try to shoot it with. Big bombs would give us no means of escape, big laser bullets would give the bomb no chance.

The bomb is the thing that’s involved in all collisions.

bom.CollidedWith

It took some time to figure out that the other parameter was actually a component and not a name.

App Inventor coding is just like real coding. If you find that you need to duplicate blocks, you should have an alarm bell going off: I need a function or a procedure as they are called in AI. The functions I have come up with this far are:

procedures

latenWeBeginnen = Let’s get started

beginMetDeOntploffing = start exploding

scoreBijwerken = update score

stopDeOntploffing = stop exploding

These procedures are used by the event handlers that AI provides. For instance, when the app starts or when the user wants to restart, we want to do the same thing:

start-or-init

This resets the game, either from start-up or when the user presses a button that we have provided below the canvas.

TODO: screen layout